Why Your Home Network Needs a Guest Network (And How to Set One Up Properly)
You’ve probably been there. A friend visits and asks for your WiFi password. You hesitate for a second, wondering if you should really share it, but then you do anyway because, well, what else are you going to do? Let them burn through their mobile data while sitting in your living room?
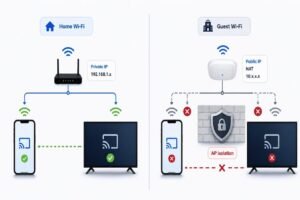
Here’s the thing though. Every time you hand out your main WiFi password, you’re essentially giving someone a key to your digital home. And while you trust your friends and family, their devices might be carrying malware, or they might accidentally access files you’d rather keep private. Even worse, that password you shared might get saved on their device and potentially exposed if their phone or laptop gets compromised later.
This is exactly why guest networks exist, and why you should set one up today if you haven’t already.
What Exactly Is a Guest Network?
Think of your home network as your house. Your main network is like the interior where you keep all your valuable possessions, personal documents, and private spaces. A guest network is like having a separate entrance and sitting area for visitors. They can access the internet (your hospitality), but they can’t wander into your bedroom or root through your filing cabinet.
In technical terms, a guest network is a separate wireless network that runs parallel to your main network but operates in isolation. Devices connected to your guest network can access the internet through your router, but they cannot see or interact with devices on your main network. This means your computers, phones, smart home devices, network storage, and printers remain invisible and inaccessible to anyone using the guest network.
The beauty of this setup is that it’s not just about keeping nosy guests out. It’s about creating layers of security that protect you from accidental threats and provide peace of mind.
Why You Actually Need a Guest Network
Let me walk you through some real world scenarios that make guest networks essential, not optional.
Protecting Your Personal Devices and Data
When someone connects to your main network, their device can potentially discover other devices on the same network. Depending on your settings, they might be able to see shared folders, access your printer, or even view what’s on your network attached storage. Most people don’t do this intentionally, but the capability exists.
More importantly, if a guest’s device is infected with malware, that malware can scan the network for vulnerable devices to spread to. Your smart doorbell, your older laptop, or that network camera you set up years ago and forgot about could all become targets. A guest network keeps this contained.
Keeping Smart Home Devices Secure
Speaking of smart home devices, here’s something most people don’t think about. Your smart lights, thermostats, locks, and cameras are often not as secure as your computer or phone. Many of these devices have weak security, rarely get updated, and can be easy targets for anyone who gains network access.
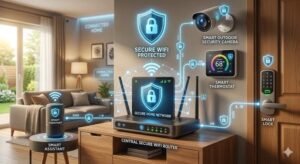
By keeping guests on a separate network, you ensure that even if someone wanted to, they couldn’t start poking around your IoT devices. Your smart home stays under your control alone.
Managing Bandwidth and Quality of Service
Guest networks also give you control over bandwidth. Most modern routers let you limit the speed available to guest networks, which means if someone is streaming movies or downloading large files on your guest network, it won’t slow down your own work or entertainment. You stay in control of your internet experience.
Maintaining Network Hygiene
Every device that connects to your network is a potential security risk. Even trusted friends might have outdated software, disabled antivirus, or apps with security vulnerabilities. A guest network is like having an airlock. It lets you be hospitable without compromising your security posture.
How to Set Up a Guest Network on Your Router
Setting up a guest network is surprisingly straightforward on most modern routers. While the exact steps vary by manufacturer, the general process is similar across brands. Let me walk you through it.
Accessing Your Router Settings
First, you need to get into your router’s admin interface. Open a web browser and type in your router’s IP address. This is usually something like 192.168.1.1 or 192.168.0.1, but you can find the exact address on a sticker on your router or in the manual.
You’ll be prompted to log in. If you’ve never changed these credentials, they’re likely set to default values like “admin” for both username and password, or “admin” and “password”. This is one of the first things you should change, by the way. Default credentials are a massive security hole.
Finding the Guest Network Option
Once you’re logged into your router, look for a section labeled “Guest Network,” “Guest Access,” or something similar. It’s usually under the wireless settings or advanced settings menu.
Different router brands place this in different locations. On a Netgear router, you might find it under “Guest Network” in the main menu. On TP-Link routers, it’s often under “Wireless” then “Guest Network.” ASUS routers typically have it prominently displayed in their user-friendly interface. If you can’t find it, check your router’s manual or search online for your specific model.
Configuring Your Guest Network
When you enable the guest network, you’ll need to configure several settings. Here’s what matters most.
Network Name (SSID): Choose a name that makes it clear this is a guest network. Something like “Smith Family Guest” or “Visitor WiFi” works well. This helps ensure your own devices don’t accidentally connect to it.
Password: Yes, you absolutely need a password on your guest network. An open network is an invitation for neighbors or passersby to use your bandwidth or potentially do something illegal using your IP address. Choose a strong password, but you can make it simpler than your main network password since it’s changed more frequently and has less access.
Network Isolation: This is the critical setting. It might be called “AP Isolation,” “Client Isolation,” or “Guest Isolation.” When enabled, it prevents devices on the guest network from communicating with devices on your main network and sometimes even from seeing each other. Make absolutely certain this is turned on.
Access to Local Network: Some routers let you selectively allow guest devices to access specific things on your local network, like a printer. Unless you have a specific need for this, keep everything blocked.
Bandwidth Limiting: If your router offers it, consider setting a bandwidth limit for the guest network. Something like 50-70% of your total bandwidth ensures guests have good speeds while protecting your own usage.
Time Limits: Some routers allow you to set time limits or schedules for guest network access. This can be useful if you want the network to automatically turn off at certain hours or after a set period.
Testing Your Setup
After configuring everything, connect a device to your guest network and try to access devices on your main network. Try typing in the IP address of your computer or attempt to find your network printer. If network isolation is working correctly, you shouldn’t be able to find or access anything except the internet.
Also test the internet speed to make sure bandwidth limits are working as intended.
Advanced Guest Network Strategies
Once you have the basics down, there are some more sophisticated approaches you can take to maximize your security.
Creating Multiple Guest Networks
Some higher-end routers allow you to create multiple guest networks. This can be useful if you want to separate different types of guests. For example, you might have one network for friends and family with reasonable bandwidth, and another for contractors or service people with more restrictions.
You could also use one guest network for your IoT devices. This is actually a smart strategy even without guests. Isolating your smart home gadgets from your computers and phones adds another layer of protection.
Using VLANs for Enhanced Segmentation
If you really want to get fancy, and you have a managed network switch and a router that supports it, you can set up VLANs (Virtual Local Area Networks). VLANs provide even more robust network segmentation than basic guest networks, giving you precise control over which devices can communicate with each other.
This goes beyond what most home users need, but it’s worth knowing about if you work from home with sensitive data or just enjoy tinkering with network configuration.
Implementing a Captive Portal
A captive portal is that webpage that pops up when you connect to WiFi at a coffee shop or hotel, where you have to accept terms or enter a code. Some routers and third-party solutions let you create a captive portal for your guest network.
This can add a professional touch if you run a business from home, and it gives you an opportunity to set expectations about appropriate use. You can also collect email addresses if you’re using your network as part of a business offering, though be thoughtful about privacy and regulations if you go this route.
Common Mistakes to Avoid
Having set up and troubleshot numerous networks, I’ve seen the same mistakes pop up repeatedly. Here’s what to watch out for.
Not Enabling Network Isolation
This is the big one. If you set up a guest network but don’t enable isolation, you’ve basically accomplished nothing. The guest network is just another entrance to the same house rather than a separate guest house. Double check that isolation is turned on.
Using No Password or a Weak One
I get it. You want to make things easy for guests. But an open or weakly secured guest network causes more problems than it solves. Anyone in range can connect, use your bandwidth, and potentially get you in trouble if they do something illegal. Always use a password, and make it at least moderately strong.
Never Changing the Guest Password
Unlike your main network password which should almost never be shared, your guest network password gets distributed more freely. Change it periodically, especially after you’ve had contractors or service people over, or after hosting a party where many people connected.
Forgetting About Guest Network Updates
When you update your router’s firmware, remember to check if your guest network settings got reset to defaults. Some updates can wipe custom configurations. After any firmware update, verify that your guest network is still configured correctly with isolation enabled.
Not Limiting Bandwidth
If you don’t set any limits, a guest downloading movies or gaming could slow your entire household’s internet to a crawl. Most people are respectful, but accidents happen, and automatic updates can kick in at inopportune times. A bandwidth limit prevents frustration.
Explaining Guest Networks to Your Guests
Here’s a social challenge that comes with guest networks: how do you tell someone they need to use the “lesser” network without making them feel like a second-class visitor?
The key is framing. Instead of saying “You can’t use our main network,” try “We have a guest network set up for visitors. It keeps everything more secure and actually gives you better speeds since it’s optimized for guest devices.” Most people appreciate knowing you take security seriously, and framing it as a feature rather than a restriction keeps things friendly.
You can also make it easy by having the guest network name and password written down somewhere accessible, or even creating a QR code that guests can scan to connect automatically. This shows thoughtfulness and makes the process seamless.
Guest Networks for Small Businesses
If you run a small business or work from home with clients visiting, a guest network isn’t just nice to have anymore. It’s essential for protecting client data and maintaining professional standards.
Consider these additional steps for business use. Document your guest network policy in your security procedures. This shows due diligence if you ever face an audit or need to demonstrate security practices. Make sure your business insurance and contracts account for your network security practices.
You might also want to implement logging on your guest network if possible. Some business-grade routers can keep records of what devices connected and when. This creates an audit trail that can be valuable for security and liability purposes.
Keep your guest network credentials stored securely and limit who has access to change settings. In a business context, network access is a serious consideration, not just a convenience.
Troubleshooting Common Guest Network Issues
Even with everything set up correctly, you might run into issues. Here are solutions to the most common problems.
If guests can’t connect at all, first verify the network is actually enabled and broadcasting. Check that the password is correct and that you haven’t accidentally set up MAC address filtering that blocks unknown devices.
If the internet is extremely slow on the guest network, look at your bandwidth limiting settings. You might have set them too restrictively. Also check if Quality of Service (QoS) settings are prioritizing traffic in a way that starves the guest network.
If devices on the guest network can somehow still see your main network devices, network isolation isn’t working properly. Go back and verify the setting is enabled, and consider restarting your router after making the change.
For connection drops or instability, check that your guest network isn’t on a crowded WiFi channel. Use a WiFi analyzer app to see what channels are congested in your area and switch to a clearer one.
The Bottom Line on Guest Networks
Setting up a guest network takes maybe 10 minutes if you’re moving slowly, and it provides ongoing security benefits that far outweigh that tiny time investment. You wouldn’t leave your front door unlocked just because you’re expecting guests. Similarly, you shouldn’t leave your network unprotected just for convenience.
A guest network lets you be hospitable while staying secure. It protects your personal devices and data, keeps your smart home under your control, prevents malware from spreading to your devices, and gives you peace of mind every time someone asks for the WiFi password.
The technology exists, it’s built into your router already, and it’s easy to use. There’s really no reason not to set one up today. Your future self, dealing with far fewer security headaches and enjoying a faster, more secure network, will thank you for taking this simple step.
So go ahead. Take those 10 minutes right now. Access your router, enable that guest network, configure it properly with isolation turned on, and set a password. Your digital home will be more secure, and you’ll never have to hesitate when someone asks for the WiFi again.